Ever put on foundation only to see it look thick, dry, or patchy? You’re not alone. This problem, called cakey makeup, can mess up an almost perfect look.
Cakey makeup happens when your foundation or base products don’t mix well with your skin. This makes your skin look textured. It can be because of your skin type, the products you use, or how you apply them.
In this article, we’ll look at why cakey makeup happens. We’ll also share tips on how to avoid it and get a smooth, natural look.
Key Takeaways
- Understand the causes of cakey makeup
- Learn how to choose the right products for your skin type
- Discover effective application techniques to achieve a smooth finish
- Find out how to fix cakey makeup with simple tricks
- Get tips on maintaining a flawless look throughout the day
Understanding Cakey Makeup: What It Looks Like
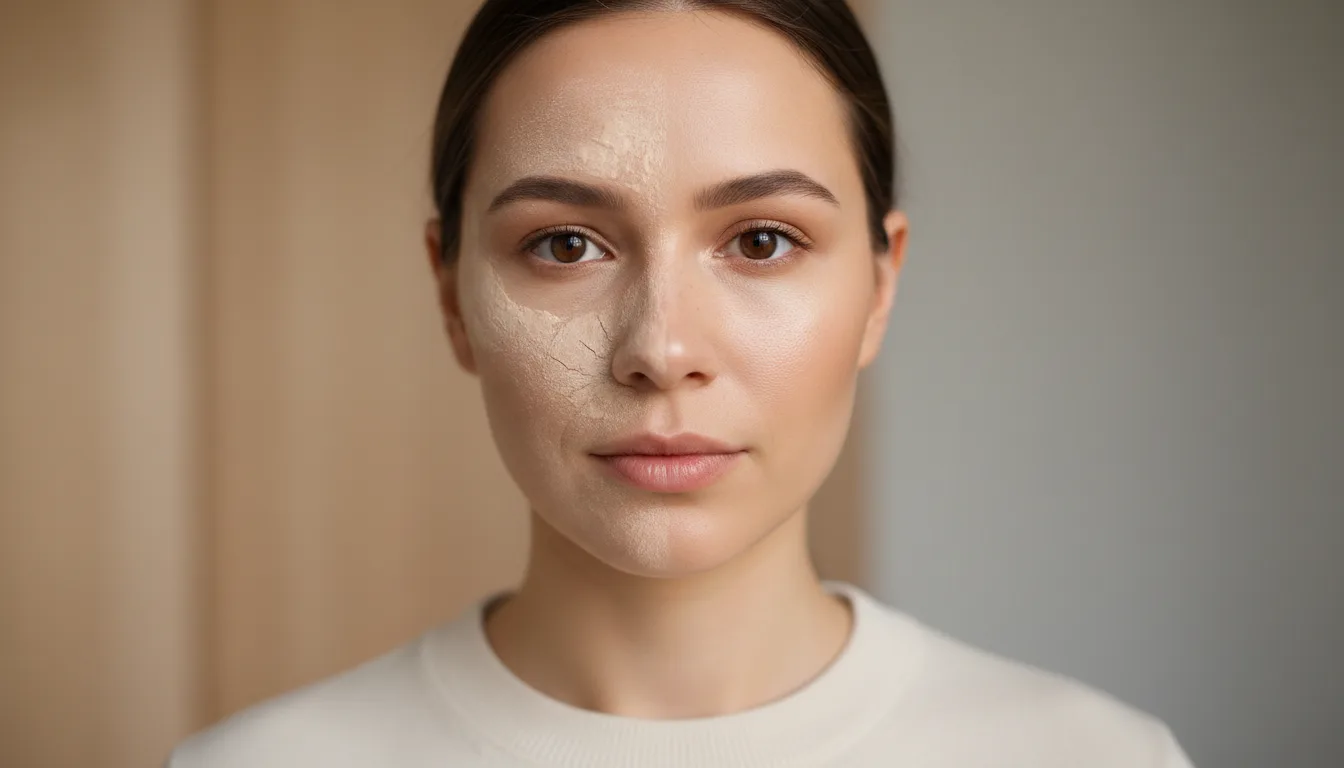
If you’ve ever applied makeup only to have it look dry and patchy, you’re not alone. Dealing with cakey makeup can be frustrating. But knowing what it looks like is key to fixing the problem.
Visual Signs Your Makeup Is Cakey
Cakey makeup looks thick and textured, making your skin seem unhealthy. It might make your foundation or powder stand out on fine lines, pores, or skin flaws. This can make your skin look dry and flaky. If you have oily skin, it can also look greasy.
- Uneven texture
- Accentuation of fine lines and pores
- Dryness or flakiness
- Visible cake-like layers of makeup
The Difference Between Dewy, Matte, and Cakey Finishes
Knowing the difference between dewy, matte, and cakey finishes is important. It helps you get the look you want. Here’s a quick comparison:
| Finish Type | Characteristics | Skin Type Suitability |
|---|---|---|
| Dewy | Hydrated, glowing, natural look | Dry or normal skin |
| Matte | Flat, shine-free, oil-controlled | Oily skin |
| Cakey | Thick, textured, dry or greasy appearance | None (undesirable finish) |
A dewy finish makes your skin look hydrated and natural, perfect for dry or normal skin. A matte finish gives a flat, shine-free look, great for oily skin. But, a cakey finish is thick and uneven, and it’s not something you want.
Why Makeup Looks Cakey: Common Causes
Cakey makeup can be frustrating. But knowing why it happens can help you fix it. Several things can cause this problem, and fixing them can make your makeup look better.
Using Too Much Product
Applying too much makeup is a big mistake. Too much foundation, concealer, or powder can make your skin look cakey. Start with a little and add more as needed.
- Begin with a light layer of foundation.
- Use concealer sparingly for targeted coverage.
- Apply powder lightly, focusing on areas that tend to get oily.
Improper Skin Preparation
Not prepping your skin right can also cause cakey makeup. Exfoliating regularly and moisturizing are key. Make sure to use products that fit your skin type.
Wrong Foundation Formula for Your Skin Type
Choosing the wrong foundation can make your makeup look cakey. For dry skin, a matte foundation can make it worse. For oily skin, you might need a foundation that controls oil. Try different formulas to find the right one for you.
Poor Application Techniques
How you apply makeup can also cause cakey skin. Using the wrong tools or too much pressure can mess up your skin’s texture. Use a beauty blender or a dense brush for a smooth finish. Blending well, around your hairline and jawline, is also important for a natural look.
By fixing these common problems, you can make your makeup look smoother and more natural.
The Science Behind Cakey Makeup
Cakey makeup happens when makeup doesn’t blend well with your skin. It can make pores, fine lines, and texture issues stand out. This leads to a cakey look.
How Makeup Interacts With Your Skin
Makeup interacts with your skin in different ways. For dry skin, makeup sticks to dry spots, making them more visible. On oily skin, makeup can break down and look uneven.
To get a smooth look, knowing your skin type is key. Use a hydrating primer for dry skin to help makeup blend better.
- For dry skin, choose moisturizing foundations to avoid dry patches.
- Oily skin does well with oil-control or matte foundations.
- Combination skin needs products that balance shine and hydration.
The Role of Skin Oils and Texture
Skin oils and texture greatly affect makeup. Too much oil can make makeup slide off, while very dry skin can make it flaky.
Knowing your skin’s natural texture and oil level is important. Choose products that match your skin type to reduce the look of pores and fine lines. This leads to a smoother finish.
Key considerations include:
- Keep your skin’s natural moisture balanced without overdoing it.
- Use the right amount of makeup to avoid a cakey look.
- Blend makeup well, focusing on the hairline, jawline, and face edges.
Mastering makeup blending techniques and understanding how to achieve a smooth look can greatly reduce cakey makeup. It’s not just about the products, but also how you apply them and the tools you use.
Skin Prep: The Foundation of Flawless Makeup
Getting your skin ready is key for smooth makeup. Proper skin prep is vital for a flawless look that lasts all day.
Cleansing Properly Before Application
Cleaning your skin is the first step. Use a gentle cleanser that fits your skin type. Proper cleansing makes a clean base for makeup, helping it stay on longer and look better.
Exfoliation: How Often and Which Methods Work Best
Exfoliation removes dead skin and clears pores. How often you exfoliate depends on your skin. Sensitive skin might need less, oily skin more. Pick a method that works for you, like a scrub or chemical exfoliant.
The Importance of Hydration
Keeping your skin hydrated is essential. Choose a moisturizer that matches your skin type. Hydrated skin looks better under makeup and avoids a cakey look.
Focus on these skin prep steps to enhance your makeup. The effort you put in will show in your final look.
Choosing the Right Moisturizer to Prevent Cakiness
Finding the right moisturizer is key to avoiding cakey makeup. It hydrates your skin, making it smooth for makeup. Choose one that matches your skin type, whether it’s dry, oily, or a mix.
Dry Skin Considerations
For dry skin, pick a moisturizer that’s rich and hydrating. Look for hyaluronic acid, glycerin, and ceramides. These ingredients help keep moisture in and support your skin’s barrier.
Recommended Moisturizer Characteristics for Dry Skin:
- Highly emollient and hydrating
- Contains ingredients like hyaluronic acid and ceramides
- Non-comedogenic or oil-free to avoid clogging pores
Oily Skin Solutions
For oily skin, choose a moisturizer that’s lightweight and oil-free. Gel or serum-based moisturizers work well. They hydrate without feeling heavy.
Key Features for Oily Skin Moisturizers:
- Lightweight and non-greasy
- Oil-free and non-comedogenic
- Contains salicylic acid or tea tree oil for their astringent properties
Combination Skin Strategies
Combination skin needs a balanced moisturizer. Look for a lightweight lotion that hydrates dry areas without making oily areas greasier. You might also use different moisturizers for different face areas.
Tips for Combination Skin:
- Use a lightweight moisturizer overall
- Apply a richer moisturizer to dry areas only
- Consider a moisturizer with balancing properties
| Skin Type | Recommended Moisturizer Type | Key Ingredients |
|---|---|---|
| Dry | Rich, hydrating | Hyaluronic acid, ceramides |
| Oily | Lightweight, oil-free | Salicylic acid, tea tree oil |
| Combination | Lightweight, balancing | Glycerin, niacinamide |
Primer Power: Selecting and Applying the Right Base
Primer is a key part of makeup, making your foundation look better. It helps your makeup stay on longer and look fresh. The right primer can fix dry patches, oily spots, and large pores, making your makeup look and last better.

How Primers Prevent Cakey Makeup
Primers are important for avoiding cakey makeup. They fill in pores and fine lines, making your foundation apply evenly. This helps your makeup:
- Smooth out skin texture
- Reduce the appearance of pores
- Provide a barrier between skin and makeup, helping foundation adhere more evenly
This way, primers help your foundation go on smoothly and last longer. They prevent it from becoming cakey or patchy.
Matching Primer to Your Skin Concerns
Choosing the right primer depends on your skin issues. For example:
- If you have dry skin, choose a hydrating primer to moisturize and smooth out dry patches.
- If you have oily skin, a mattifying primer can control shine and reduce pore appearance.
- If you’re worried about fine lines and wrinkles, a primer with anti-aging ingredients can fill them in and smooth your skin.
Matching your primer to your skin type and concerns is key to a great makeup look.
Application Techniques for Smooth Results
Applying primer correctly is as important as choosing the right one. Here are some tips for smooth results:
- Apply a small amount of primer to your face, focusing on areas where you tend to get cakey or oily.
- Use your fingers or a makeup sponge to gently blend the primer into your skin, making sure to cover all areas evenly.
- Allow the primer to set for a minute or two before applying foundation.
By following these simple application techniques, you can get a smooth, even base for your makeup. This helps prevent cakiness and makes your foundation last longer.
Foundation Fundamentals: Formulas That Won’t Cake
Finding the perfect foundation can be tough, but knowing the different types helps a lot. Foundation is key in makeup, as it holds everything in place. The right one can make you look great, while the wrong one can highlight flaws.
Water-Based vs. Oil-Based Foundations
There are many foundation types, like water-based and oil-based. Water-based foundations are light and good for oily skin or a natural look. They’re also great for hot weather and controlling shine. On the other hand, oil-based foundations are hydrating and good for dry or older skin, giving a shiny finish.
Choosing between water-based and oil-based depends on your skin and desired look. Water-based is better for oily skin and a natural look. Oil-based is more moisturizing for dry skin.
Coverage Levels and Their Impact on Texture
Foundation coverage can be sheer, medium, or full. The coverage you pick affects your makeup’s look and feel. Sheer coverage foundations give a natural look without heavy makeup. Medium coverage balances, covering small blemishes naturally. Full coverage foundations hide all imperfections, perfect for big events or hiding flaws.
| Coverage Level | Description | Suitable For |
|---|---|---|
| Sheer | Natural look, minimal coverage | Everyday wear, minimal flaws |
| Medium | Balances coverage and natural appearance | Minor blemishes, normal skin |
| Full | Maximum coverage, conceals imperfections | Special occasions, significant coverage needed |
Finding Your Perfect Foundation Match
Finding the right foundation is more than just matching your skin tone. It’s also about picking a formula that suits your skin type. For oily skin, look for “non-comedogenic” or “oil-free” foundations. For dry skin, choose ones with moisturizing ingredients.
“The key to a flawless makeup look is a well-chosen foundation that matches your skin type and tone.”
Test foundation shades on your jawline to find the best match. Also, think about the foundation’s ingredients and how they affect your skin. This can greatly impact your makeup’s look.
Application Techniques to Achieve a Flawless Finish
The secret to a smooth makeup look is in how you apply it. Learning these techniques can make your makeup look better and last longer.
Tools That Make a Difference: Brushes, Sponges, and Fingers
The tools you use can change how your makeup looks. Brushes are great for detailed work, like eyeshadow or concealer. Sponges help you get a smooth finish, perfect for foundation or blush. Fingers are good for applying concealer or cream eyeshadow, giving a closer feel to the skin.
Choosing between brushes, sponges, and fingers depends on the product and face area. For example, a dense brush is best for eyeshadow, while a damp sponge blends foundation well.
Layering Products: The Right Order and Amount
Layering makeup is an art that needs the right order and amount. Begin with a primer to prepare your skin. Then, apply a thin layer of foundation or tint to even out your skin tone. Use concealer only where needed to hide blemishes or dark circles.
| Product | Order | Amount |
|---|---|---|
| Primer | 1st | Thin layer |
| Foundation/Tint | 2nd | Thin layer |
| Concealer | 3rd | As needed |
Blending Methods for Seamless Results
Blending is key for a smooth makeup look. Use soft, sweeping motions with your tool to blend makeup with your skin. For liquids, a damp sponge prevents cakiness. For powders, a soft brush buffs the product into the skin.
To get a flawless finish, blend, blend, blend! Take your time and check your work often.
The Setting Powder Dilemma: Friend or Foe?
Learning how to use setting powder right is key to a perfect makeup look. It can help set your makeup, but wrong use can make skin look dry and textured.
When and Where to Apply Setting Powder
Applying setting powder in the right spots can really help. Focus on areas that get oily or need more coverage. The T-zone is often a top choice because it tends to get oily.
“The trick to using setting powder well is to use it sparingly and in the right spots,” makeup artist Jane Doe advises. “It’s about boosting your natural look without looking too done up.”
Baking vs. Light Dusting: Which Is Right for You?
How you apply setting powder can change your look. Baking means putting on a thick layer and letting it sit before dusting off. It’s perfect for a long-lasting, matte finish. Light dusting is for a more natural look, where you just sweep a bit of powder over your face.

Avoiding the Powdery Look
One big problem with setting powder is it can make your skin look powdery. To avoid this, blend the powder into your skin well. Use a light touch and build coverage slowly. Also, pick a powder that matches your skin tone to blend in better.
- Blend the powder well into the skin.
- Use a light hand when applying.
- Choose a powder that matches your skin tone.
By following these tips and knowing when to use setting powder, you can get a smooth, lasting makeup look without the bad sides.
Setting Sprays: The Final Step for Long-Lasting Smoothness
Using a setting spray can really help keep your makeup looking perfect all day. These sprays act as a shield, protecting your makeup from sweat and oils. They’re a key part of many makeup routines.
How Setting Sprays Lock in Your Look
Setting sprays create a thin, invisible shield over your makeup. This shield stops your makeup from smudging or fading too fast. It’s important to pick a setting spray that matches your skin type and makeup goals.
Dewy vs. Matte Setting Sprays
The choice between dewy and matte setting sprays depends on your skin and desired look. Dewy sprays are great for dry skin or a radiant glow. Matte sprays are best for oily skin or to control shine.
| Setting Spray Type | Skin Type | Finish |
|---|---|---|
| Dewy | Dry/NORMAL | Radiant/Glowing |
| Matte | Oily | Matte/Shine Control |
Application Tips for Maximum Benefit
To use your setting spray best, hold the bottle 6-8 inches from your face and spray evenly. For an even longer-lasting effect, try the “baking” method. Spritz your under-eye area, let it sit for a few minutes, then dust off any extra powder.
Adding a setting spray to your makeup routine and picking the right one for your skin can give you a flawless look all day.
Quick Fixes for Cakey Makeup Throughout the Day
Cakey makeup can be a real problem, but there are quick fixes. You can tackle a cakey foundation, powdery concealer, or uneven texture easily.
Emergency Touch-Up Techniques
Don’t worry if your makeup gets cakey. Here are some quick fixes to rescue your look:
- Blot, don’t wipe: Use blotting paper to soak up extra oil.
- Refresh your primer: Apply a bit of primer where needed.
- Conceal imperfections: Use a concealer that’s lighter than your foundation for dark circles or blemishes.
Products to Keep in Your Makeup Bag
Having the right products can make a big difference. Here are some must-haves for your makeup bag:
| Product | Purpose |
|---|---|
| Blotting papers | Absorb excess oil |
| Primer | Refresh and smooth out texture |
| Concealer | Cover dark circles and blemishes |
| Setting spray | Lock in your look |
Preventing Midday Makeup Meltdown
Preventing cakey makeup is easier than fixing it. Here are some tips to keep your makeup looking fresh:
- Start with a clean slate: Make sure your skin is clean and moisturized before makeup.
- Use the right products: Pick products that match your skin type.
- Set your look: Use a setting spray to keep your makeup in place.
- Touch up regularly: Blot oil and reapply as needed.
By using these quick fixes and tips, you can keep your makeup looking perfect all day.
Conclusion: Your Flawless Makeup Checklist
Getting a flawless makeup look is easier than you think. Follow the tips and advice given, and you’ll say goodbye to cakey makeup. Here’s a quick checklist to help you start right.
First, get your skin ready with the right cleansing, exfoliation, and hydration. This is key for a flawless makeup look. Next, pick products that match your skin type, like a good moisturizer and primer. Use the right tools and techniques for a smooth finish.
To avoid cakey makeup, blend, blend, blend! Apply products lightly and set your look with a setting spray. Keep a setting powder and compact foundation in your makeup bag for touch-ups.
By using this flawless makeup checklist and these makeup tips daily, you’ll get a smooth, cakey-free finish. Remember, practice makes perfect. Don’t worry if it takes time to get it right. With patience and effort, you’ll master the art of avoiding cakey makeup soon.